1. Home
  2. Phone
  3. Auto Attendant
  4. How to Transfer Calls from Auto Attendant to Voicemail

How to Transfer Calls from Auto Attendant to Voicemail

About

This article demonstrates step-by-step instructions for How to Transfer Calls from Auto attendant to Voicemail.

Step-by-Step Instructions

The below table will detail the steps required to accomplish your goals:

12

Login

Login to the Management Portal by clicking a sign-on provider or entering your Email Address and Password as shown in Exhibit 1. If you don't have an account, you can sign signup instantly by clicking here.
Management Portal Login Form

Configure Auto Attendant to Route to Voicemail

Ensure that you have already created an auto attendant. If not, go through the steps outlined in How to Create a New Auto Attendant.

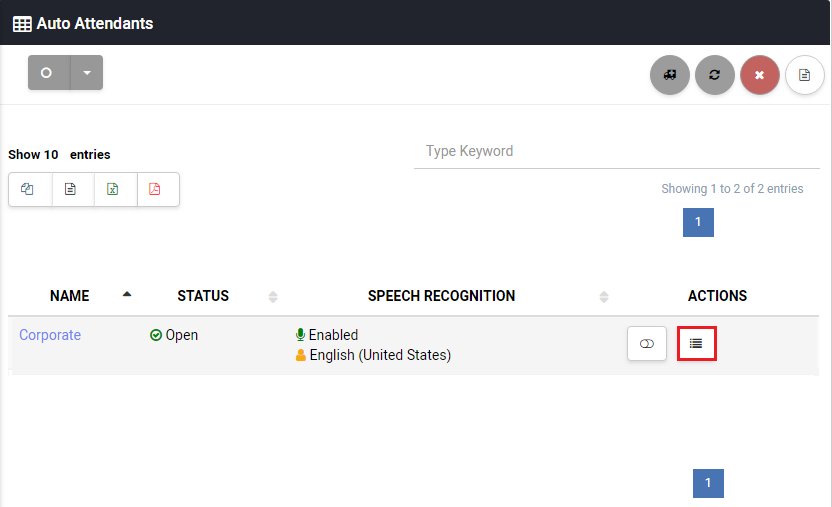
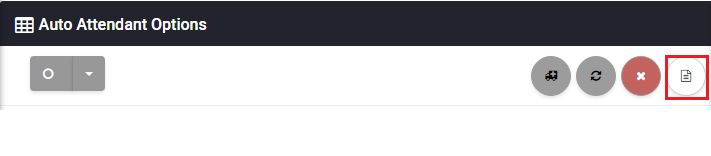
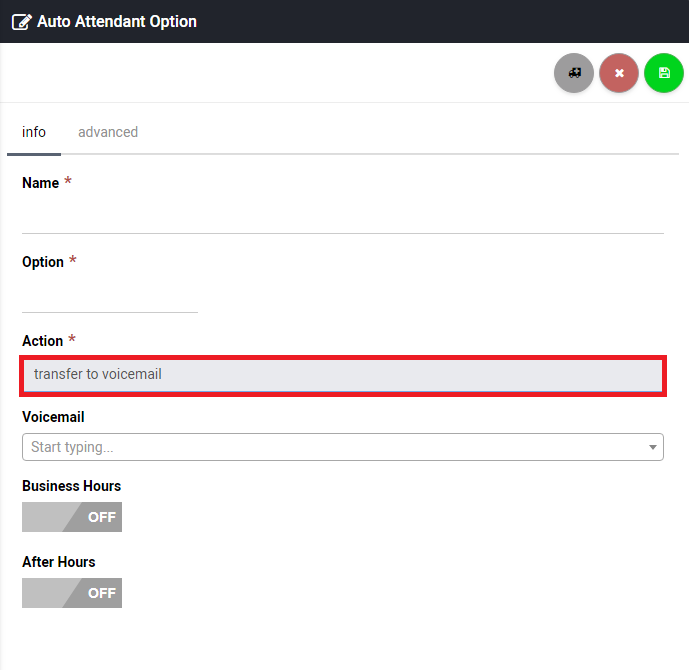
Now, let’s go back to the auto attendant that you just created and click on Menu icon under Actions as shown in Exhibit 2a. Then, click on the New icon on the upper right portion of Auto Attendant Options page as shown in Exhibit 2b. To transfer a call to Voicemail, ensure you select that under Action, and click Save to commit your changes as shown in Exhibit 2c.

For your convenience, a description of each field is given below:
Name
A descriptive name for auto attendant.
Option
Enable business/after hours phone options (e.g. Press 1 for Sales, 2 for Billing, 0 to leave a voicemail). 
Action
Executes an action. For this, select “Transfer to Voicemail
Voicemail
Select the voicemail account you want to transfer calls to (e.g. General Voicemail).
Business Hours
Turn slider on if it is your Business Hours IVR.
After Hours
Turn slider on if it is your After Hours IVR.
IVR to Voicemail
Auto Attendant
IVR to Voicemail
Auto Attendant Options
IVR to Voicemail
Auto Attendant to Voicemail

Conclusion

Congratulations! You have now completed the "How-To Transfer Calls from Auto Attendant to Voicemail" article and we hope that you have accomplished the goals you set out to achieve. However, if for any reason you may still require assistance with setup, simply login to the Management Portal and submit a support request.


print
Updated on November 16, 2018

Was this article helpful?

Related Articles