Topology Builder
The first step to configuring Skype for Business SIP Trunking is to add the PSTN gateways. Unfortunately, this can only be done via the Skype for Business Server Topology Builder.
Once you have added the PSTN gateways, you can complete the remaining setup by running the Skype PSTN Connector Powershell Script in Step 4.
So let’s get started! Open the Skype for Business Topology Builder if you haven’t already done so as shown in Exhibit 1.

Add PSTN Gateways
2A. Expand the site where you would like to configure Skype for Business SIP Trunking, then Shared Components. Next, right-click PSTN gateways and click “New IP/PSTN Gateway” to start the wizard as shown in Exhibit 2A. Enter the PSTN Gateway Hostname Address as shown below under Localized Termination URIs and click Next.
2B. Select the listening IP addresses for your mediation server (default is applicable in most cases) as shown in Exhibit 2B and click Next.
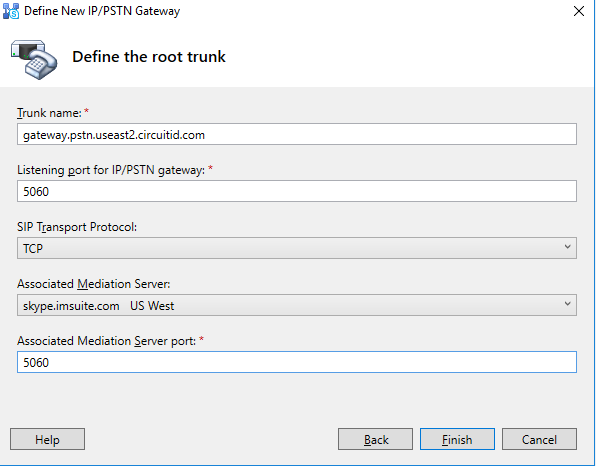
2C. Change “Listening port for IP/PSTN gateway” to 5060, “SIP Transport Protocol” to TCP, “Associated Mediation Server port” to 5060 as shown in Exhibit 3, and finally click Finish.
Repeat steps 2A through 2C for all PSTN Gateways listed below:
[su_localized_termination_urls]

Publish Topology
Publish your Skype for Business topology to commit and save your PSTN gateway changes and ensure that your Skype for Business Mediation server is up to date with your topology.
You can check your Mediation server’s topology status by running the below command in the Skype for Business Management Shell utility and checking the value of “UpToDate” for your mediation server role. If it is set to True, proceed to Step 3, otherwise if False, continue to Step 3 only when this value has changed to True.
Get-CsManagementStoreReplicationStatus
Run Skype PSTN Connector Powershell Script
Download, unzip and run the Skype PSTN Connector Powershell Script on your Frontend or Mediation server. This can be done by executing the below command in the Skype for Business Management Shell to complete setup.
Note that the Skype PSTN Connector script will configure your Skype Server to connect with our gateways, normalization rules for dialing and SIP Trunking redundancy across 5 geographically disbursed locations.
cd "[Directory where you unzipped the SkypePSTNConnector.ps1 file]"
./SkypePSTNConnector.ps1
Also, note that you can open the Skype PSTN Connector Powershell Script in your favorite editor to review the commands it will be running. This will allow you to extract a subset of commands to execute if you are merely adding us on as an additional SIP Trunking provider.
Firewall Configuration
Almost done!
Open the following ports on your firewall to Circuit ID SIP and Media IPs:
| Service | Port | Protocol |
| SIP Signalling | 5060 | TCP |
| Media | 10000 thru 20000 | TCP/UDP |
That’s it, stick a fork in it, you’re done! You can now make and receive calls utilizing today’s most robust Skype for Business PSTN network.


