1. Home
  2. Phone
  3. Virtual Extensions
  4. How to Create a Virtual Extension

How to Create a Virtual Extension

About

This article demonstrates step-by-step instructions for How to Create a Virtual Extension.

Product Features

Conference Rooms
Your organization has a conference? Create a Virtual Extension that anyone in your organization can dial to reach the conference room.


Step-by-Step Instructions

The below table will detail the steps required to accomplish your goals:

123

Login

Login to the Management Portal by clicking a sign-on provider or entering your Email Address and Password as shown in Exhibit 1. If you don't have an account, you can sign signup instantly by clicking here.
Management Portal Login Form
Now, navigate to Phone >Virtual Extensions as shown in Exhibit 2a. Next click the create icon on the top right-hand side of the page as shown in Exhibit 2b.
Phone directory tab
Navigate to Phone
 Fill out Details
Create New Virtual Extensions

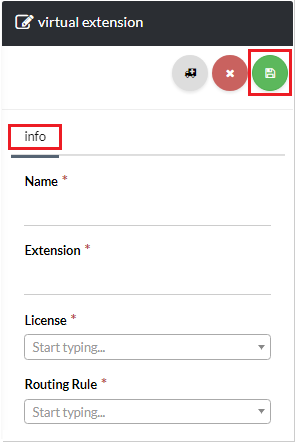
Fill out the Virtual Extension Details

You are almost done! Let’s finish up.

Now, complete the required fields for the Virtual Extension’s Info tab, and click the save icon on the top right-hand side of the page as shown in Exhibit 3. For your convenience, a description of each field is given below.

Name
Enter the name of the virtual extension here.
Extension
Enter an extension number.
License
Choose a license from the drop down menu.
Routing Rule
Choose an inbound routing rule from the drop down menu.
 Select Phone Numbers
Create New Virtual Extension

Conclusion

Congratulations! You have now completed the "How-To How to Create a Virtual Extension" article and we hope that you have accomplished the goals you set out to achieve. However, if for any reason you may still require assistance with setup, simply login to the Management Portal and submit a support request.


print
Updated on February 2, 2018

Was this article helpful?

Related Articles