[su_howto_introduction text=”How to Add a Call Queue”]
[su_howto_steps]
1234
[su_management_portal_login]
[su_phone_menu content=”Queues”]
General Settings
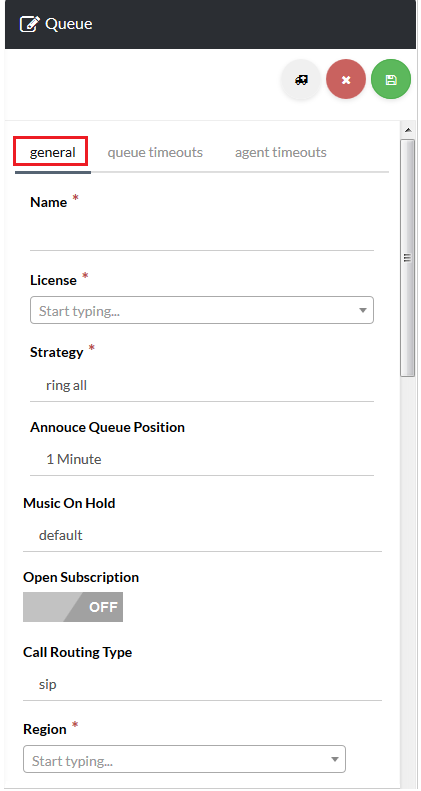
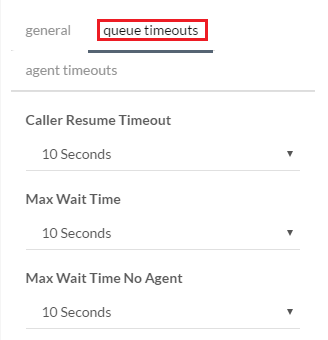
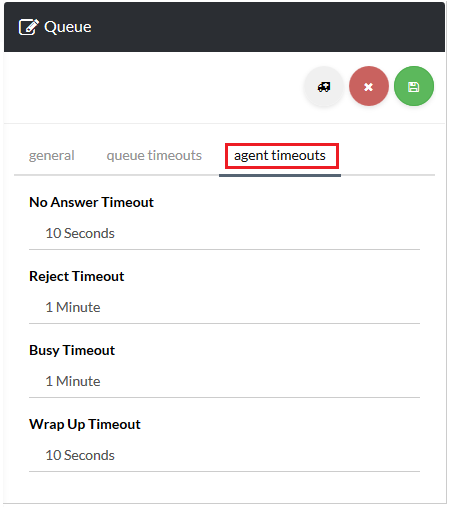
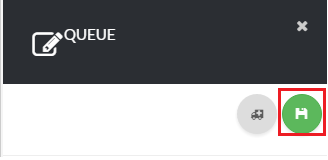
Fill out the information for the General section [su_exhibit text=”3a”], Queue Timeouts section [su_exhibit text=”3b”], and Agent Timeouts section [su_exhibit text=”3c”]. Click the save icon on the top right-hand side of the page [su_exhibit text=”3d”].
[su_field_description]
General
Name
A descriptive name for your Queue.
License
Choose a license from the drop down menu.
Strategy
The algorithm you prefer for your queue.
Title
Description
Ring All
Rings all agents simultaneously.
Longest-Idle-Agent
Rings agents in order of longest idle.
Round-Robin
Rings agents in order of position starting at 1, however, remembers the last tried agent.
Top-Down
Rings agents in order of position starting at 1.
Agent-With-Least-Talk-Time
Rings agents in order of least talk time.
Agent-With-Fewest-Calls
Rings agents in order of fewest calls.
Sequentially-by-Agent-Order
Rings agents sequentially by tier, then by order.
Announce Queue Position
Notify users about their position in the queue.
Music on Hold
The music to be played while the call is on hold.
Open Subscription
When enabled it allows users to join and leave the call queue through the call queue widget.For more information on the call queue widget see How to Use the Call Queues Widget
Call Routing Type
Select between SIP or Skype.
Region
Choose Region for the call queue.
Queue Timeouts
Caller Resume Timeout
If the caller is disconnected (e.g. cell phone dropped), based on the Caller Resume Timeout the caller will be able to resume their queue position.
Max Wait Time
Maximum amount of time a caller should be allowed to be in the queue before the queue times out.
Max Wait Time No Agent
Maximum amount of time (timeout) a caller should be allowed to wait in the queue when no agents are available.
Agent Timeouts
No Answer Timeout
If the agent doesn’t answer an offered call, this settings controls the minimum delay the agent will receive a new call.
Reject Timeout
If the call is rejected, this setting controls the minimum delay until the queue will ring the agent again.
Busy Timeout
If the agent is busy, this setting controls the minimum delay until the queue will ring the agent again.
Wrap Up Timeout
After an agent completes a call successfully, this setting controls the minimum delay until the queue will send the agent new calls.
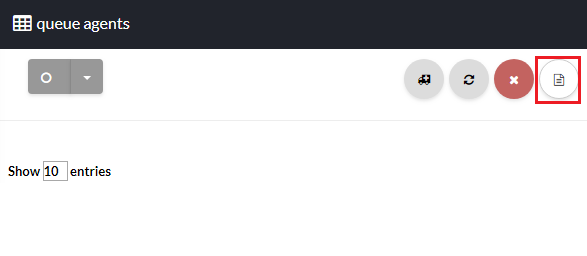
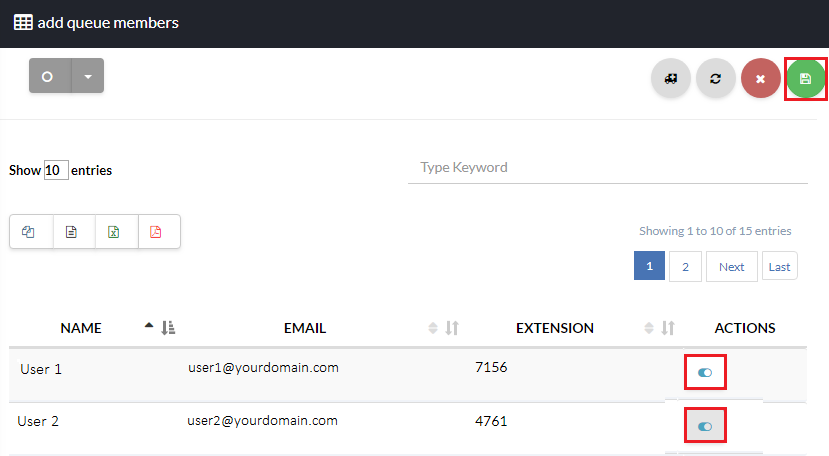
To add members to the call queue click the members icon next to the call queue [su_exhibit text=”4a”]. Now, click the create icon on the top right hand side of the page [su_exhibit text=”4b”]. Next, click the slider bar next to the members you would like to add to the call queue. Click the save icon once you are done [su_exhibit text=”4c”].